How To Improve The Look Of Your Home With Custom Hardwood Flooring

Choose Engineered Hardwood Flooring

Flooring plays a role in how your home feels because it can completely transform the space. Many people choose hardwood floors to bring a natural and elegant look into their homes. Solid hardwood is a traditional option, but there is also another choice to consider — engineered hardwood.

What Is Engineered Hardwood Flooring?

Engineered hardwood is made out of layers of wood compressed together in a criss-cross construction. These layers are a thin strip of real durable wood species on top of high-grade plywood.

One of engineered hardwood’s greatest strengths is its ability to stand up to humidity and moisture. The plywood is stable enough that it won’t flex and bend in the presence of moisture. Its durability means it won’t contract and expand with the changing seasons, so the floor won’t warp or cup over time. As a homeowner, you can enjoy hardwood without moisture concerns.

Because of this construction, you have more freedom with engineered hardwood. This flooring can go in rooms that solid hardwood could not, such as a below-grade basement, the kitchen or bathrooms, as long as these spaces do not have major problems with moisture.

Perhaps the best feature is engineered hardwood’s price tag. In many cases, engineered hardwood is more cost-effective than solid hardwood. It is an affordable wood flooring option for a large space, such as your living room.


Engineered Hardwood

Pros

Engineered hardwood flooring offers great durability, much like solid hardwood flooring. Less expensive options with fewer layers should last between 20 and 40 years, and higher-end varieties with more layers can last from 40 to 80 years with proper maintenance. Another major pro of engineered hardwood is that its layered construction makes it relatively resistant to moisture damage (certainly more so than solid hardwood). This makes engineered hardwood a suitable flooring material for almost any room in your home, including those that are below grade. And while it can be nailed down to a subflooring, like solid hardwood, engineered hardwood can also be installed as a “floating” floor, where the planks are glued or snapped together and not affixed to the surface below. This allows engineered hardwood to be installed atop existing flooring materials, such as linoleum, vinyl, or even tile, and also allows for installation on top of concrete. Engineered hardwood is also more environmentally friendly than solid hardwood. Due to the fact that it uses less hardwood overall in its construction, it requires fewer trees be cut down for manufacturing. Given its good durability and wide market appeal, engineered hardwood is a great investment in your home.

Cons

Although engineered hardwood can be sanded and refinished, this can only be done a handful of times at most because of the limited thickness of the hardwood veneer. So, although you can expect a long lifespan out of your engineered hardwood, it doesn’t quite have the longevity of solid planks. For this reason, major damage to part of the floor may require replacing individual planks rather than resurfacing the entire floor. This is really the only downside of engineered hardwood flooring, and it can be mitigated to a great extent with some basic care and maintenance.


Types of Engineered Hardwood Floors

Engineered hardwood comes in a wide variety of beautiful wood selections, such as:

  • Hickory
  • Birch
  • Maple
  • Red oak
  • White oak
  • Walnut
  • Cherry
  • Brazillian cherry
  • Bamboo
  • And more

Each of these wood species will bring a different look to your home. Our technician will work with you to decide which engineered wood best suits your needs.


Should you float, nail, staple, or glue your engineered hardwood?

There are different factors that come into play when making this decision. It depends on the type of surface over which you are installing the floor. It also depends on the environment where you live. Is this a retrofit or new construction?

You should install a floating engineered hardwood when you need flexibility. Installing a floating engineered hardwood floor works well at any grade level and over most types of subfloor surfaces. A floating engineered wood flooring installation on concrete can be an excellent choice if your subfloor is below grade. It’s also a great option if you choose to incorporate a radiant heat system.* (Don’t forget the vapor retarder!)

In contrast, gluing hardwood to concrete provides you with a very permanent solution. Gluing works well when you are installing engineered hardwood over a concrete subfloor, but be sure you clearly understand the manufacturer’s application instructions before you glue that floor.

Plan to nail down the engineered hardwood flooring when you have a wood subfloor. As long as you use the correct pneumatic nail gun, this technique provides the installer with a simple and controlled approach to the installation.


Hardwood Floor Maintenance

For most hardwoods, the maintenance is the same regardless of size, finish, or wood species. The floor should be swept or vacuumed without a beater bar as needed and damp mopped with a cleanser made for wood floors. If necessary, throw rugs can be used to prevent scratches or scuffs. If a surface finish is used, reapplication and buffing may be required every five to ten years.

Clean spills immediately to avoid moisture damage. Don’t use steam mops on hardwood floors since they can cause irreversible damage. Protect the floor by using furniture on the legs of any movable furniture pieces like couches.

Best Hardwood Flooring Tips To Save You Money

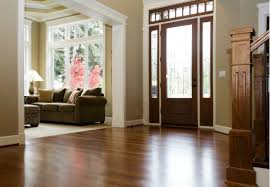
Pros & Cons of Hardwood Flooring in the Kitchen

There is a lot that happens in a kitchen that can cause damage to wood. So, one might assume that hardwood flooring wouldn’t be the best choice for a kitchen. Surprisingly though, hardwood floors, when sealed and cared for properly, work well in kitchens and can be a great option.

Yes, they are prone to water damage and plank hardwood flooring requires sanding and refinishing every decade or so, but they’ll last the duration of a home’s lifetime if they are properly maintained. That being said, they do need to be taken care of, which is why hardwood flooring isn’t for everyone.

Deciding if Wood Floors are Right for Your Kitchen

Hardwood floors are beautiful and work with any design style. If you’re in the process of remodeling a kitchen with existing hardwood floors, we recommend keeping them unless you’re dead-set on replacing them with tile or an equally durable selection. If you’re not remodeling, but simply considering new floors for your kitchen, weighing these pros and cons will help you decide if hardwood is the way to go with your kitchen’s flooring.

Beauty

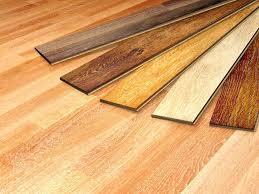
Natural wood is gorgeous, and the variety of color and wood grain patterns mean there’s a hardwood type for everyone. If you have a particular color in mind, be mindful that some woods take stain better than others. If you’re interested in sanding the floors and refinishing them to a color that better coordinate with your kitchen, you’ll want to pay close attention to samples, and test different stains to ensure it looks the way you want it to when the project is complete.

Durability

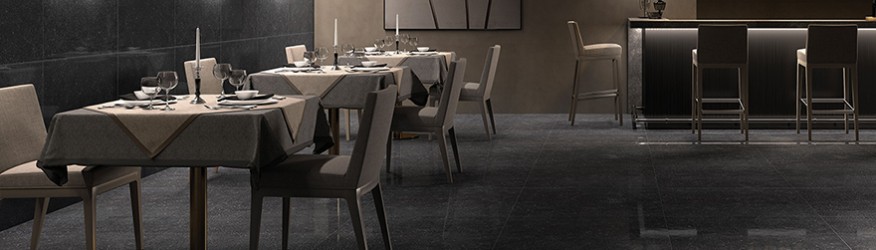
Water is a hardwood plank’s worst enemy. Water damage will cause a plank to warp and/or split. For this reason, many homeowners question whether wood is durable enough to be a good flooring choice. In truth, tile or concrete are the most water-resistant flooring options, but wood is a close second/third. A spill or puddle that is mopped up quickly will never cause a problem. It’s standing water, or an unresolved leak, that will cause a level of damage that would require a replacement.


What to Do with Furniture When Getting New Floors

You’ve finally decided to take the plunge and treat yourself (and your home) to a brand new floor. Maybe you’ve gone for the hardwood you’ve always dreamed of in the dining room, or maybe you’re refreshing up the carpet in your much-loved family room. Perhaps you’re giving your home a total flooring makeover. It’s an exciting time, but how are you supposed to put a new floor in without moving your whole family out?

What to Do with Furniture When Getting New Flooring

Furniture and belongings must be out of the way in order for your new flooring to be installed. Exactly what you choose to do with your furniture will depend on several factors.

You can start to formulate a plan by asking yourself a few questions:

How big is your new flooring project?

Do you plan to get new flooring in just one room or the whole house? If you just need to temporarily shift a small kitchenette table and two chairs to a balcony, that’s one thing. However, if you need to think about all the furniture in every room in your home, that’s another.

How long will installation take?

You’ll also need to consider the time frame for the installation. If you’re on a tight schedule and need your furniture out fast that might change your game plan.

How big is your home?

If you have several spare rooms and a two car garage, you have more options to shift your furniture than if you live in a studio apartment in midtown.

What’s your budget?

When it comes to moving (and storing) furniture, it’s generally a choice between money and muscle. Can you carry a couch by yourself or with a buddy? Can you afford to pay someone else to do it? Or do you have funds to temporarily move it to a storage unit?

Do your hardwood floor or carpet installers move furniture?

Some companies may include furniture moving in their quote, although it’s not a standard. If you do have this option, it can save you time (and maybe a sore back!). However, it may increase the total cost of your installation.

Once you have the answers to those questions, you will probably have enough information to choose between these three main strategies for dealing with your furniture while your new flooring is installed:

Musical Chairs

Simply, move your furniture to another room while your new flooring is being installed. If you’re having multiple rooms refloored, it may mean a lot of moving and carrying from room to room. It’s hard work, but it doesn’t cost a dime — and your beloved armchair never has to leave the house.

Garage or Shed Storage

This option only works if you have outdoor storage space. A shed or garage can be a makeshift home for your furniture while you’re putting in a new floor. However, you must be confident that the facilities are waterproof and secure to avoid damage to your furnishings. Otherwise, this is an extremely convenient option.

Short-Term Storage

Renting a storage unit for a full month may be overkill for a small flooring project, but it can make life a lot easier. This rings especially true if you live in tight quarters or if you’re flooring more than one space in your house. Rented storage is convenient, safe, and secure. No constant shuffling of chairs and tables or tripping over furniture awkwardly crammed into the wrong room. If you really want to give yourself a break, you can also hire someone to move it there.


Things You Don’t Want on Your Hardwood Floors

With distinctive grains and unique tonal qualities, hardwood floors are a beautiful, time-tested addition to any home or office. Unlike carpeting or vinyl that often needs replacing after 10 or 12 years, hardwood is a “forever floor” that can last for decades—if you take good care and the precautions listed below in our wood floor tips

To preserve the ageless style of hardwood floors, start by following manufacturer’s advice for cleaning and maintaining proper humidity in your home, and stop these seven things that can detract from the look and long life of natural wood flooring:

Unprotected “feet” on furniture can be damaging to hardwood. Cover all plastic, metal, and wood bottoms with felt protectors.

Long pet nails can scratch the wood’s protective surface. This allows dirt and debris to burrow into the grain, build up, and damage the wood over time.

High heels easily scratch and dent wood’s surface and leave it exposed to more extensive harm. In fact, a 125-pound woman with spiked heels or a shoe nail protruding from a high heel yields as much as 8,000 pounds per square inch of pressure—that’s more than enough to leave a trail of noticeable indents on the surface of any hardwood floor.

Cleaners and polishers can work wonders on vinyl or ceramic tile—not hardwood floors. Ironically, 2-in-1 cleaners containing acrylics or urethane polish actually dull wood and strip its finish after only a few applications. Self-polishing acrylic waxes can also make hardwood floors dangerously slippery.

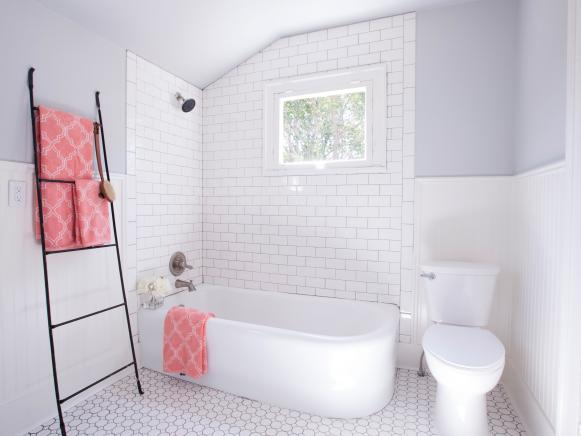
Water, over time, will slowly deteriorate your wood’s finish and leave it unprotected. Even water from a traditional mop or steamer will eventually damage the wood and lead to warping. Instead, remove spills immediately with a damp cloth and stick to dry dusters.

Rubber-backed area rugs have two ill effects on hardwood—they prevent air ventilation, sealing any moisture or spills in the wood, and often contain glues or adhesives that can compromise and corrupt your hardwood surface.

Direct sunlight can either fade or darken your floors, causing discolorations in areas near windows. Exotic species and cherry woods tend to darken as the sun’s UV rays “burn” the wood, while other woods can lighten after extended exposure to sunlight.


The Impracticality of Hardwood Flooring

My absolute hands down favorite flooring choice for a home is real wood, even more than engineered hardwood. I love the look and feel of real wood in a home, in family rooms, bedrooms, anywhere. Real wood has the warmest look and a softness underfoot that tile and vinyl can’t really compete with.

But today I’m sharing my tale of woe regarding my hardwood floors, specifically in my kitchen. My kitchen addition was eleven years ago and I at the time I chose more traditional style cabinetry. If I was doing it again now I’d go with a different cabinet style like Shaker and quartz countertops not marble but that’s not the point. The focus today is on the hardwood flooring, more specifically, it’s impracticality in kitchens.

Because I’m a lover of consistent flooring throughout downstairs community spaces, when we added this kitchen to the house eleven years ago I opted to continue the hardwood into the space for seamless flow. The truth is that over time we experienced water damage in this space on several occasions, first where that French door access has to the courtyard, next under the sink and dishwasher, and this month, under the icemaker.

I’m not alone in this experience, my parents chose hardwood for their new build fifteen years ago and when their icemaker leaked a huge section of the flooring had to be replaced at great expense. I’ve heard other stories of water damage from friends and clients too because hardwood flooring’s greatest foe is water.

Ever since I refinished my hardwood floors in a dark stain a year and a half ago I’ve been anxious about any water that spills on it, whether it’s from the dishwasher or the pet bowl or any moisture spill at all. Aaaaaand just last month, the icemaker started leaking and now look what’s happened to my beautiful floors… they’re buckling from moisture and I will need to have these boards replaced. This wood runs under under the cabinetry which means the cabinets and countertop next to the fridge have to be removed to adequately repair the floors. UGH.


It’s Time to Stop Putting Hardwood Floors in Every Room

I almost entirely blame real estate shows for the modern malady that I’d like to call “Decor Generic-itis.” It’s marked by a distinct anxiety of making a mistake in one’s home decor scheme that leads to an almost paralyzing fear when it comes to any decor decision. As a result, you default to the trinity that nearly every prospective home buyer or makeover recipient lists on that show as must-haves: granite, stainless steel, and hardwood floors.

It’s not that these features are bad or tacky. They are not. But these features aren’t always what suit your life, personality, or your property’s overall design. When arbitrarily added to a home, they can take away character, creating an odd cookie-cutter look (thus the “generic” part of “Decor Generic-itis”). As a result, all interiors (regardless of the age of a home) can have an odd, similar look. It’s especially noticeable when someone gets the idea to renovate their home to add hardwood floors.

Hardwood floors are NOT a cure-all for property value.

Look, I’m not saying that they’ll make your home worth less. But it’s not going to be the detail that suddenly takes your house up in value to the next hundred-thousand bracket. You might recoup your costs, yes. Especially if you had bad ’80s carpet beforehand. But it seems like hardwood floors are an expected feature, so they’re not valued as much as they used to be.

Your home can echo like crazy.

Any and all sound practically bounces off of the pristine surface of hardwood floors, especially TV noise. This is only a good thing when you quickly run to the kitchen for a snack in the middle of a mystery miniseries without pausing.

It’s better to have a high-quality floor covering than a low-quality wood.

No one’s budget is infinite, after all. Skimping on material can lead to durability concerns (or even toxicity), not to mention that you probably won’t get the stain or finish you love. But you can often find higher-quality options in carpeting or tile for the same price.

The Trials Of Tile Flooring Installation

tips for choosing tiles

LIGHT COLOURS

Choose light colours to make a small/dark room feel bigger and brighter.

BE ADVENTUROUS!

However, don’t be afraid of colour, which can also create some unique effects and environments in your home. Personal preference is the key

DON’T COMPROMISE

See tiles as an investment, not a cost; never compromise on quality, which can still be picked up at great prices

PLAN AHEAD

Always purchase an additional 5-10% more tiles than you actually need. This allows you (or the tiler) to compensate for cuts and breakages and ensures you have the same batch/shade should you have needed additional tiles. Most companies will offer a refund on unused boxes of tiles.

BLEND IN THOSE GROUT LINES

Choose a tile grout colour that compliments your tiles to help blend in grout lines.


Ceramic Tile Flooring Tips

Bigger isn’t necessarily better, but it’s definitely easier. Larger tiles are much easier to install than small ones. Larger tiles are commonly used for bathroom walls, but are great for kitchens and other rooms too. The smaller 1x1s are going to take longer to set, so choose a small pattern

What you can’t see, will hurt you. If you don’t have a flat subfloor, you won’t have a successful install. Self-leveling subfloor compound works great and is easy for a DIYer to install. Other options are plywood or cement backer board, but regardless of what is used, the subfloor should be at least 1″ thick to ensure a quality job.

Squaring a room is as easy as 3-4-5. The best method to squaring a room is using a 3-4-5 triangle. Measure 3 feet against one wall, 4 feet to the center of the room and connect the two lines to make a triangle with a 5 foot line. If the room is larger, use 6, 8 and 10-foot lines. If it’s smaller, use 18″, 24″ and 30″. Mark off all lines by snapping a chalk line along the measurements

Make the best of a sticky situation. Thin-set not only keeps tiles on the floor, it can make up for minor imperfections in the subfloor. There are different thin-sets for each application of tile, but for ceramic tile, use a latex modified thin-set. Latex modified thin-set only needs water. Remember, only mix what can be spread or used in an hour, otherwise, the job will become very hard. There is also a premixed thin-set which would be better for wall tiles. It is stickier and the tiles won’t move much. With thin-set, you can always add a little more on one side if the subfloor isn’t perfectly level or take away a little on the other side to straighten the subfloor.

If cutting corners, rent a wet saw. Renting one will save time and frustration. Unless it’s a perfect house with perfect rooms, you will have to cut the tiles. The time saved in cutting all of the tiles perfectly will pay off immediately. Wet saws are relatively inexpensive and can usually be picked up in any home supply store


FIND YOUR PERFECT TILE

With so many choices, finding the perfect tile may seem overwhelming. Your best resource are the professional interior designers at our Premier Dealers and showrooms. (And consultations are free!) But to get started, we have gathered basic information to help narrow the options.

SELECTING FLOOR TILE

Explore the different types of tile, variety of applications, and detailed information needed to make your best floor tile choice.

SELECTING WALL TILE

From large scale to mosaic and all the different options, delve into expert advice for selecting the ideal wall tile.

RESIDENTIAL SPACES

There are a few things you should be aware of before selecting tile for your home. For instance, as a rule, glazed floor tiles shouldn’t be used where water, oil or grease is consistently present. This may cause increased risk for slippage. Daltile also does not recommend glazed floor tiles on home exterior applications unless tiles are sufficiently protected from direct weather or are a textured tile.

COMMERCIAL SPACES

Commercial spaces come with a slew of construction requirements. Selecting tile that meets these requirements is easy at Daltile. We test our tile for DCOF, breaking strength, and more, and we provide the results to you so you can make the best decisions. We always meet, and often exceed, ASTM standards but we encourage customers to have tile independently tested to determine if the product meets specific requirements.


FLOOR TILE BUYING GUIDE

Ceramic floor tile is a water-resistant flooring option that is both durable and stylish. Perfect as a bathroom, kitchen, or shower floor tile, ceramic is a more affordable alternative to natural stone. Tile has been the go-to flooring option for decades, so the odds are pretty good that you’re familiar with it, and you might even be considering it for your next floor. Still, you probably have some questions you want answered before you make your decision

Floor tile is designed to be thick and sturdy enough to hold up against foot traffic, while wall tile is thin and light for easier installation. Some floor tiles can be installed on walls, depending on the size and weight

I recommend you consult a professional before choosing to install floor tile on your walls. Lots of factors go into determining how flooring tile will work as a wall treatment. Meanwhile, wall tile won’t ever be a good option for flooring, simply because it’s too thin and delicate.

Though it might all look and even feel similar, not all tile is the same. Different types of tile will be better suited to you depending on your budget and your needs.

Discover the differences between ceramic, porcelain, and real stone, and then decide what option is best for you.


Choosing the Right Tile

Not all tiles are created equal. Well, they’re basically the same, but there are many small differences to consider when deciding the application intended.

Tiles are a combination of clay, minerals and solvents that are shaped and sized and then heated to very high temperatures. At this point, the tile can just stay as is and is considered finished. It’s unglazed and without decoration. Without the glaze, the tile is very porous and, though attractive in a rustic way, it wouldn’t be wise to use it at this stage in areas where spillage might be common, like the kitchen.

Glazing adds a non-porous element that’s usually impermeable and therefore good for all areas, including kitchens and baths, foyers and countertops. A good idea is to take this one step further and seal the grout around the tile so that it’s also waterproof

Besides being beautiful, ceramic tile is a desirable surface. Let me count the ways: It’s strong, colorfast, and flame-resistant, it doesn’t conduct heat or electricity, it’s hygienic, it won’t absorb odors or emit hazardous chemicals, it won’t swell or contract in extreme temperatures, and it’s easy to clean

Where do these tiles come from? All around the world. Is tile from Spain better than tile from France? No, the only real differences are in design and perhaps shape

Tips To Buy The Best Hardwood Flooring

The Glue Down Method of Installing Hardwood Flooring

Glue down is When using the glue-down method, hardwood adheres to the subfloor, or to a moisture barrier that is mounted directly on the subfloor, using a strong adhesive. Although some exceptions may exist, we recommend attaching only engineered hardwood products. The subfloor must be completely dry and level to ensure proper installation. There are several different types of adhesives on the market. A professional installer will use the type of adhesive that is specifically recommended for your wood flooring products.


Glue-down Floors

How it works

There are numerous reasons why people opt for glue-down installations as their preferred fixing method. Whilst we’ll get to the pros and cons in a minute, let’s look at what glue-down floors entail.

As with all fixing methods, you’ll need to ensure your subfloor is completely level. Gluing is often used when laying over concrete or wood. A strong adhesive specifically made for wood flooring is required to ensure longevity and premium quality. The adhesive is then applied to the subfloor in small, workable sections. This is done to ensure the glue doesn’t dry prematurely. As with laying any wood floor, you need to ensure an appropriate expansion gap is left.

Glue-down floors, technically, are usable on all wood flooring types. However, it is mostly used on solid wood boards which do not have a click or tongue and groove system. Whilst it can be used on flooring with these systems, it’s often seen as less cost-effective due to the extra materials and time needed for installation.

If you are laying over concrete, it’s crucial to ensure there is no dampness within the subfloor. Even the smallest amount can lead to issues in the future. If you can’t be certain there’s no damp, you can use a liquid damp proof membrane (DPM) before you glue your flooring down. This adds a protective layer to prevent the moisture getting into the wood.


The Benefits and Drawbacks of Glue Down Flooring

Glue down hardwood flooring often sounds more like real solid hardwood flooring than floating floors do. Because of the way it is installed there isn’t a hollow sound when walking across the floor or a spongy feel, this is something that can be an issue with floating floors if they aren’t installed perfectly and with optimal conditions.

Benefits:

  • Glue down hardwood flooring also doesn’t require a vapor barrier because the glue itself acts as the barrier. This can reduce the installation costs for this type of flooring a bit, though they are comparable to one another when you account for the cost of glue and increased labor costs.
  • Glue down flooring also shifts a bit less, and it can be used in surfaces that aren’t quite as level as what is required with floating floors.

Drawbacks:

Even though glue down hardwood flooring types come with quite a few benefits, they also take much longer to install than floating floors do.

  • They are more difficult to install and will come with higher labor costs if you have professionals put them in.
  • These floors are more difficult to remove if you decide you want to replace them down the road, and you’ll be working much harder to take off the adhered boards than you would with a simple click and lock type of floating floor.


General Instructions Prior to Installation

It is recommended that the flooring be installed at a 90 degree angle to the joists for wood subfloors. An additional 5% flooring must be added to the actual square footage needed for cutting and grading allowance.

Plan out the installation determining an appropriate color match of boards. Floor should be installed from several cartons at the same time to ensure good color and shade mixture.

Remove any existing base molding, other moldings, door sills and old floor covering where applicable. Using a hand saw, undercut the bottom of door frames ¾” to slide hardwood board beneath.

Do not use flooring pieces with obvious defects. It is the installer’s/owner’s responsibility to ensure that the conditions of the flooring are acceptable prior to installation. The manufacturer declines any responsibility for flooring which is installed with obvious defects and/or flooring which is installed under improper jobsite conditions.


Before you begin

Before the installation begins, it is important to perform a thorough job-site inspection. Ensure that the HVAC is operational and the hardwood product is completely acclimated to the temperature and humidity at which the room will be maintained when occupied. The floor will be glued directly to the sub-flooring using a hardwood flooring adhesive. With that said, one of the most important factors while dealing with glue down installation is going to be your subfloor.

Subfloor

Subfloor preparation is critical on all job-sites, but especially for glue down. Subfloor preparation can range from sanding, scraping, leveling, filling low spots or installing a whole new subfloor. A general guideline while leveling your subfloor would be not to allow more than 3/16” difference in height within a 10 feet diameter. When gluing over a concrete slab, it is important to take proper moisture readings. The concrete slab needs the proper moisture vapor protection underneath and proper drainage away from the building. Once your subfloor preparation is complete and your floor is level it is time to choose an adhesive.

Adhesives

All adhesives are not made the same. When choosing which adhesive is right for your project, consider how hardwood flooring glue is specifically made for hardwood. Hardwood is a natural product and will expand or contract with the change in humidity as it takes on moisture or loses moisture. The difference between hardwood flooring adhesives is that they are made to embrace natural characteristics of wood, which is why it is specially formulated to be more elastic than other adhesives. The elasticity in hardwood flooring glue ensures that the hardwood will have an ample amount of space to expand and contract without causing the glue to crack or separate. Improper floor preparation, using the wrong adhesive, or applying incorrect amounts are all common pitfalls of a failed flooring installation. Certain hardwood adhesives also contain elements which act as a moisture barrier and/or a sound reduction. Be sure to consider all of these traits when choosing which adhesive to use. Next, let’s move on to installation.

Installation

Once you have decided to use the glue down floor method, make sure that you leave a large enough expansion gap, depending on the hardwood product you chose, from the wall to allow the wood to contract and expand. The adhesive is spread on an area of the subfloor where the boards are going to be adhered to using a specialized trowel. While installing, be sure to do small areas at a time. Do not pre-spread the adhesive over the entire sub-floor as it will dry before you get to that area. Furthermore, periodically during the installation, lift a board after you have placed it to make certain you have full coverage of the adhesive to the back of the flooring product. This will help ensure your floor will remain bonded to the subfloor for years to come. Once your flooring is installed it is best to let it dry for 24 hours, during this time you should not walk on it. The amount of adhesive used is adjusted by the teeth size of your trowel and may be dependant on if you need vapor barrier properties.