Be Picky About Your Future Home Builder

Home Building Timeline

Though the average time taken to build a home is about 8 months (as per the US Census Bureau), multiple factors affect the timeline. The geographic location, the type of home being built, and the actual construction process can influence how long it takes to build a home.

How to Build a Home: Step by Step Planning Guide

To build a home, you first identify a location, purchase the property, prepare your dream home plans (or purchase them), and get all of the permits and licenses in order. Once the groundwork is over, you hire a contractor and gear yourself up for the actual construction.

Excavation, Foundation, Ground Leveling

The very first step that a contractor takes is mapping out the layout of your new home on your purchased plot of land. This is one of the most exciting steps because your home construction officially begins with the clearing of rocks/trees/existing structures and the leveling of the site for proper drainage. During week 1, the contractor will also set in place the footings of your new home into the ground.

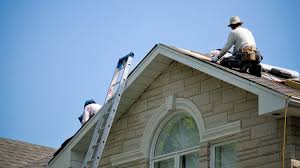
Framing the House & Roof Install

After the foundation is built, the next step is to erect the frame of your home. The frame consists of the exterior walls, the floors, and the roof rafters. Once all of those sections are framed, sheathing is applied to the walls and the roof. They are also covered with house wrap – a protective barrier that prevents water from breaching your house while allowing water vapor from inside to escape. Once the framing work is completed, an inspection takes place.

Mechanical, Electrical, and Plumbing (MEP)

After the foundation or the skeleton of the home is ready, the next step is to install the wiring and the plumbing of your home. When you visit your under-construction home during the MEP phase, you will see lots of wires, pipes, vents, and sewer lines everywhere. Some siding work will also take place during month 3.


Building your new home

Building a new home can be an exciting challenge, leading to a home that’s perfect for you and your family. This guide covers some of the basics, but always get professional advice before taking the next step

Turn-Key home and land package

Simplify your build with a complete package of home and land from a developer. An initial deposit is required with the remaining balance paid upon completion.

Build only

Buy your ideal section and engage a builder to construct your dream home.  There are various options from a standard design to a one-off architecturally designed home.

Kitset or pre-fabricated home

Choose a home design, and have it shipped to your site either as a ready-to-build kitset, pre-built components or a complete home.

Pros

You usually need to provide a deposit up front before the build starts and no further funds are required until the build ends.

You don’t pay interest on your loan until you settle, which is a great help if you’re already paying rent or a mortgage on your current home during the build.

Most design and build companies already have a portfolio of house designs to choose from and this can save time.

The price is usually fixed.

Cons

Generally house and land packages are only available at certain locations. This can limit your choices.

Limited design options means limited customisation and personal touch.


Your guide to understanding the building process

Pre-Construction

Once you make the decision to build, it’s important to be familiar with the first steps in the pre-construction stage. During this stage, there are many important tasks that take place, including choosing your home design, having the engineer’s drawings prepared and obtaining all necessary paperwork to apply for a building permit.

At this stage, it’s important to have a good grasp of your budget and the style of the home you like. While the approvals are being processed, you will get to work with a Prestart Consultant to choose from a great range of colours and fittings to create a theme for your new home. This is a wonderful opportunity for you to really start customising your home and developing a theme that reflects your personal style and preferences.

During this stage, it’s also important to familiarise yourself with the land developer requirements and find out if the block you have chosen is titled or untitled. This is quite an important element because if your lot is untitled, construction process cannot commence until titles are issued.

Construction

This is the most exciting part of the building process. There are six stages in the construction process:

Stage 1 – Slab Down

The first stage of construction involves preparing your block and working on the foundations for your home. Before your slab can be poured, your concreter will work with the plumber to ensure all the pipes are in place. Once the slab is laid, the sewerage drains will be installed so that all previously laid pipes can be connected up to the sewer.

Stage 2 – Brickwork

This stage is all about erecting the frame for your new home and ensuring all metal supporting angles for windows and external doors are in place for the next stage.

Stage 3 – Roof Cover

Once the brickwork is complete, it’s time to build the roof frame that will support your roofing materials. The electricians and plumbers will return to site to complete the installations of plumbing and electrical tubes, with the roofers now ready to work on the roof cover and gutter installation.

Stage 4 – Lockup

The lockup stage is when all windows and external doors are installed. It’s time to start on the inside – plastering, ceilings and cornices, installing the windows and fixing the entry door – so that your home is ready to receive the finishing touches that make your house a home.

Stage 5 – Practical Completion

The final stage of the construction process is when all internal works are done and completed to your satisfaction- internal doors and shelving, electrical and plumbing, cabinetry, waterproof and ceramic tiling, flooring, shower screens, mirrors, plumbing and gas fit-off, and last but not least the site clean-up.

Stage 6 – Handover

This is the point in time you’ve been waiting for. The handover stage is when your new home has been completed to your satisfaction – and to the plans, and after paying the final invoice, the keys will be handed over to you.


Building Guide

As with any large project, planning and research is key to a home that meets your needs and stays within budget. We’ve prepared this series of Home Buyer “How-to” pages to provide you with information and questions to ask, where to start your process and what to expect. It’s not an exhaustive list, as each building project has its own quirks, but our years of experience show that building a log home with Katahdin generally involves similar steps in the process.

Site Locations

Finding land or a lot site for your cedar log home can be challenging. If you haven’t yet located land, you’ll want to work with a broker in the area who understands the ins and outs of lots and land in your area. If you’re building in an area new to you, you’ll want to get a good picture of the climate as well – average snowfall and/or rain totals, temperature ranges, hours of daylight, potential for winds from hurricanes or strong storms. Here are some of the factors to consider when looking at land.

Sketching, Plans and Pricing

This initial stage of putting your dreams down on paper and developing a budget is an important and exciting step in the journey of building

Wells and Septic Systems

If you’re building in a rural or remote setting, most likely you’ll need to build a private water and waste system.

Selecting Insulation

Most people take a hard look at a car’s miles-per-gallon ratings when researching a new vehicle. Yet it seems that fewer people take a look at their home’s “mpg” or energy efficiency, especially when it comes to insulation.


Progress to your new home with the HomeBuilder scheme.

The recently announced Federal Government HomeBuilder scheme is making it even easier for home buyers and those looking to build a new home to get onto the property ladder. A $25,000* grant will directly help young families, first home buyers, upgraders and downsizers realise their goal of home ownership sooner.

What is the HomeBuilder scheme?

The HomeBuilder provides eligible owner-occupiers (including first home buyers) with a $25,000 grant to build a new home, or substantially renovate an existing one

How do I apply for the HomeBuilder grant?

You can’t apply for HomeBuilder just yet. Information on when you’ll be able to apply will be released through the relevant State or Territory revenue offices. You can contact them directly if you have questions about when and how you’ll be able to apply.

What are the eligibility requirements for the HomeBuilder Scheme?

To access HomeBuilder, owner-occupiers must meet the following eligibility criteria:

you are a natural person (not a company or trust);

you are aged 18 years or older;

you are an citizen;

you meet one of the following two income caps:

$125,000 per annum for an individual applicant based on your 2018-19 taxable income or later; or

$200,000 per annum for a couple based on both 2018-19 taxable income or later.

you enter into a building contract between 4 June 2020 and 31 December 2020 to either:

build a new home as a principal place of residence, where the property value does not exceed $750,000; or

substantially renovate your existing home as a principal place of residence, where the renovation contract is between $150,000 and $750,000, and where the value of your existing property (house and land) does not exceed $1.5 million (pre-renovation);

construction must commence on or after 4 June and within three months of the contract date

What if I want to buy an off-the-plan apartment or townhouse?

Off-the-plan apartments or town houses are eligible for HomeBuilder. If you sign the contract to buy the off-the-plan dwelling on or after 4 June 2020 and on or before 31 December 2020 and construction commences on or after 4 June 2020 and no later than three months after the contract is signed then the property purchase may be eligible for HomeBuilder.

Get Your Bathroom Remodeling Superhero

Where Does Your Money Go for a Bathroom Remodel?

Per square foot, no room in the house takes more work or costs more money to remodel than the bathroom. The combination of plumbing, moisture content, electrical wiring, and decorating schemes packed into the smallest residential spaces create unique demands on remodeling a bathroom. Yet, these same demands also place unmatched value on bathroom spaces, whether in terms of day-to-day living or home property values.

Finished Products vs. Labor and Expenses

Like a kitchen remodel, there will be substantial costs in finished products from flooring, bathtubs, shower surrounds, cabinets, countertops, and numerous bathroom fixtures. These products, however, don’t typically have the same price tags as major kitchen appliances and full cabinet and countertop installations. Plus, bathroom remodeling is a more labor-intensive process between tearing out old bathroom amenities and tedious tile and plumbing installation. 60-70 percent of bathroom remodel costs are labor and expenses and about 30-40 percent is finished product. Of course, this cost breakdown indicates only an estimated average, as the cost breakdown of specific projects can vary quite a bit.

Difference Makers: Plumbing, Bathroom Designs, and Bathroom Tile

Undoubtedly, the biggest difference maker is plumbing and bathroom design. Already one of the costliest and involved subcontractors for bathroom remodeling, if a homeowner wishes to relocate a toilet, sink, or bathtub within the bathroom, extensive plumbing installation will be required, causing a substantial spike in the cost of labor and expenses. In fact, if you’re set on relocating your bathroom plumbing, not only will you need a substantially larger budget, but you’ll need more contingency room in your budget, as any number of obstacles can arise once the walls are torn out.

Another reason bathroom remodeling costs tend to skew toward labor and expenses is the prevalence of bathroom flooring and shower tile. Even the size of the tile will play a role in the cost breakdown of your new bathroom floor. Smaller tiles may cost less from the manufacturer but will require more labor to install. Dot inserts for your tile can also get expensive quickly, as tile accents can cost $12-$40 to cut per insert.

The Huge Cost Differences of Bathroom Remodeling

No remodeling project shows the cost difference between economical and luxury projects, and no remodeling project holds the potential for greater swings in the breakdown of finished products vs. labor and expenses. You might be able to find a low-end shower door, for example, for as little as $300, while luxury shower doors can run more than $3,000. A bathtub can range from $400 to more than $8,000 to buy and install. Shower surrounds can be just as varied. For a master bath with a separate shower and tub, installation costs can range from $3,500-$12,000. These huge differences in cost are also supported by the Remodeling Magazine Cost vs. Value Report. Other remodeling projects show twice the cost when upgrading from a mid-range to an upscale project. Meanwhile, an equivalent upgrade for bathroom remodels causes the average cost to triple.


Questions to Consider Before Your DIY Bathroom Remodel

So you’ve caught the DIY bug and are feeling inspired by the new year to tackle your own bathroom remodel—congratulations! You’ve got this under control and can be confident that you’re making the right decision in remodeling your bathroom to add extra value to your home. Plus, if you’re doing this on a budget you’re adding even more value to your pocket by cutting down on the expenses of renovation by doing most of the work yourself. You clever homeowner, you.

But before you get started, there are some questions you’ll want to consider that can make everyone’s life much easier. And when you’re done and enjoying the peace and quiet of your brand-new (well, kind of) bathroom, you’ll be glad you did.

What’s your mold protection plan?

There are many different options for mold-proofing your bathroom, but you’ll want to have the materials prepared and ready to go to streamline the process. Once you’ve stripped your bathroom down to bare bones, it’s time to re-build from the ground up, and if your bathroom is prone to mold, it may be worthwhile to investigate your mold protection options. For example, blue board is a form of drywall that’s mold resistant and only costs a few dollars more.

Don’t forget the fan.

It may not sound like a big deal, but think about all the moisture your bathroom creates on a daily basis, trapped in such a small space. A fan is a necessity in keeping your bathroom as healthy and mold-free as possible. But what kind should you buy? If you opt for a separate fan and light, your overall cost will be cheaper, but they’ll be trickier to replace. If you decide to go with a combination fan, you’ll be spending more money, but will be choosing the more convenient option.

What kind of budget do you need for professional services?

There’s a lot you can do on your own for a bathroom remodel, but if you’re touching plumbing or electricity, you will need to hire a professional. A remodel is a great opportunity to assess if your current bathroom is working for you and move outlets to a more convenient location or update plumbing to more efficient versions.


Remodeling Advice for Your Upcoming Project

Bathroom Remodeling Tips

When renovating your bathroom, it can be confusing to know which design options to pick and choose. Sometimes the results you seek can be achieved most effectively and more affordably with a near-total transformation. Comfort Shower and Bath provides help with your remodeling decisions through the guidance of our talented consultants during a private, in-home appointment that we offer as a complimentary service. Even better, by working with Comfort Shower and Bath, you are assured an exceptional outcome because we supply and install only high-quality bath fixtures, enclosures and hardware options, a brand widely recognized as the epitome of luxury and craftsmanship.

Bathroom Remodeling Tips & Ideas

Your bathroom is meant to be a sanctuary where you can literally and figuratively let down your hair. Keep this all-important point top of mind when making changes to this space. You’ll want it to be relaxing as well as functional, convenient as well as stylish

To ensure that things don’t get too cluttered or the décor too busy, here are a few things to consider:

A neo-angle shower takes up a minimal amount of space in a small bathroom.

Small bathrooms also benefit from open shelving rather than enclosed cabinets and vanities.

Solid colors are ideal for small spaces that can be overwhelmed by patterns.

An eye-catching hardwood or tiled floor does much for the overall impact of any size space.

An intense, deep color on the walls makes a more dramatic impression.

Pay extra attention to lighting, including dimmer switches, under cabinet lighting, and overhead lights, to assure ample coverage at all times of day or night.

When you have a tight budget, a basic bath liner can solve many issues while improving the bathroom décor.

The minimalist look is popular right now, and can give your bathroom décor longevity.

Choosing a Bathroom Remodeler…

When you are ready to move forward with your bathroom remodel, look for a company that is experienced and provides all the services you need. When choosing a bathroom remodeler, you should also look carefully into the quality and variety of the products that they install. At Comfort Shower and Bath, we’re happy to provide a FREE initial consultation and price estimate for any of our bathroom remodeling services.


Things to Look for in Bathroom Remodeling Services

Interested in remodeling a bathroom in your home? You may benefit from looking for the top bathroom remodeling services in your area.

While the “Do It Yourself” approach is commendable, it’s not always the best course of action. Weekend projects and small improvements may not need professional handiwork. A major undertaking, however, can quickly turn into a renovation nightmare. You may inadvertently increase your bathroom remodel cost after it’s too late.

Do You Need the Expertise of Bathroom Remodeling Services?

If you’re replacing an existing bathroom component, like a toilet seat or a towel bar, you can call in a handyman or fix it on your own. The same goes for adding and installing relatively simple pieces, such as shower doors or a new light fixture.

Does your renovation idea go beyond your skills and willingness to pay an hourly rate? Do you think it could be a job for more than one person or more than one weekend? It’s at this point that you should consider bathroom remodeling contractors.

Remodeling Contractor?

There’s no secret or special knowledge involved in choosing the best among all the bathroom remodeling services available to you. The tips below are basic starting points and can be used as a good base when you’re excited and planning a dream renovation.


Things You Should Think About Before Renovating Your Bathroom

It’s no secret that remodeling your bathroom is a great financial investment for your home. Remodeling your bathroom is one of the best home remodeling projects you can do to increase the resale value of your home.

The Layout of your Bathroom

Before you start remodeling your bathroom, think about your layout and make a plan! Think about the layout and style of your current bathroom and think about what you want to improve.

Is there cracked tile or is your shower leaking? Do you need to install new cabinets? Are you constantly bumping into things? Is your sink too low or high? Think about all of these things before you start your remodeling project.

Plumbing

Many people think that it’s easy to move your shower, sink, or toilet to a different place in your bathroom. But actually, it’s very costly to move the plumbing around in your bathroom

Ventilation System

If it takes a long time for your windows to air out after taking a warm shower, it may be time to upgrade your ventilation system. Having a system to reduce mold and mildew is extremely important not just for overall health reasons, but for adding resale value to your home. Adding a fan and also adding a window to your bathroom will certainly help keep mold and mildew out.

Cost Effective Home Renovation

Ways to Easily Minimize the Cost of Home Renovations

There are many reasons why homeowners decide to renovate their homes. Maybe your family has expanded and you need more room for everyone to feel comfortable. Maybe your needs have changed and you need an adequate accommodation to meet them. Or maybe your house is just old, worn out and in dire need of a facelift. Regardless of what the reason behind your remodeling is, you need to know that this is an expensive project. However, there are ways to reduce costs during a home renovation. Here are ten of them.

Improve the Efficacy of Available Space

Whenever you think of remodeling a certain space, especially the kitchen, you think of giving it a few extra square feet by probably knocking down the walls. Why not just utilize the available space to maximum instead? You could opt for a cabinet with drawers instead of large shelves that hog up all the space in the kitchen. Invest in the cabinets that are tall, and have wide pull-out drawers. You could also spend some money on the racks and dividers that lets you store all the kitchen supplies without taking up a lot of space.

Consult Multiple Contractors

It is always good to send out requests for multiple contractors, before zeroing in on one of them. You can contact the firms or individuals that provide renovation services in your neighborhood. You could even take suggestions from your friends and family that have recently undergone remodeling of their houses. Once you get some promising leads, reach out to them with the further information and plan about the renovation and ask for quotes. Remember, don’t be in a hurry, and be sure to go with the one that provides best and quality service at a good price.


Create and Stick To a Budget

Before we get started, I wanted to talk about what a “budget renovation” means. The word “budget” isn’t synonymous with cheap. Whenever you spend money, it’s a good idea to know how much of your total income or savings is allotted for the purchase, whether it’s simply a meal out, or something big like a new stove. If you’re planning to do work on your home, I recommend starting with a dollar amount that you’re able to spend before you begin making design choices. Then you can price fixtures and materials and begin to get a grasp on what will work with your budget and what won’t.

Pay Cash

It might sound simple, but paying for your project with money you already have will save you a significant amount of money you’d end up paying in interest if you take out a loan or put things on a credit card that you can’t immediately pay off. If you’re renovating in order to sell your home, it might make sense financially to take out a loan when you know there will be a return on your investment and the loan will be paid off quickly. But in general, paying in cash is the best way. If you can’t afford it now, begin thinking about ways you can trim your household budget to save money for your project.


Consider Long-Term Costs, Not Just Short-Term Gains

If your addition calls for clapboard siding, for instance, you can save more in the long run by ponying up now for the preprimed and prepainted variety. It costs an extra 10 to 20 cents per foot, but you’ll wind up paying for half as many paint jobs down the road.

The reason? Factory finishes are applied on dry wood under controlled conditions—no rain, no harsh sun. I used prefinished claps on my house about ten years ago and the only flaw in the finish is the occasional mildew spot, easily washed off. The paint looks as if it’ll be good for another ten years, easily.”

Consult an Architect

Depending on the scale of your project, you might not need a full-on architectural commission, which involves extensive meetings, multiple job-site visits, and several sets of construction drawings, to the tune of about 8 percent of a project’s construction budget. You might be able to tap an architect’s design savvy by having him undertake a one-time design consultation.

Do Your Own Schlepping

If you’re doing your own project, slash your materials-delivery fees by picking up goods yourself. No pickup truck? For about $400, you can purchase a nearly new single-axle utility trailer online, which you can tow behind your SUV. Get one just big enough to carry 4-by-8 sheet goods flat. Use it for a half-dozen trips, and it’s paid for itself. Find trailers for sale near you via eBay Motors, or try your local classifieds.


Save on electricity

During a remodeling, it is almost inevitable for the utility bills to jump up to the skies because of all of the plugged in equipment, but you can do your best to minimize the damage. For example, you can ask your contractor to use energy-efficient equipment and plug out the equipment when it is not in use. Keep in mind that such an extensive electricity use can lead to malfunctions. Tampering with electricity on your own is not only dangerous, but in some countries, it is also illegal, so it would be best to have a professional emergency electrician on your speed dial.

Stick to your original plumbing points

Bathroom reno is among the most expensive projects, and you don’t have to make it even more expensive than it has to be by moving the plumbing. Instead, talk with a professional plumber about how to use the most of your current layout. The same goes for the kitchen and the laundry plumbing points.


Pick decent, midgrade materials

Picking premium options or materials can raise the cost of your remodeling project substantially. One area where you’ll find a major price difference? Carpeting.

While basic olefin and polyester carpeting costs around $1 to $2 per square foot, wool can cost upward of $9 to $11 per square foot, according to Angie’s List. Those costs add up if you’re recarpeting a large room or an entire floor.

 Don’t do a complete remodel

Unless the room needs to be completely gutted, you can cut costs by refurbishing existing fixtures. When renovating the kitchen, staining the current cabinetry, replacing old drawer handles and knobs, and refacing moldings can save you thousands of dollars.

In fact, refinishing existing cabinets can save you up to 50% compared with the cost of buying new cabinetry, according to Angie’s List. You can also cut costs by purchasing materials (e.g., granite, flooring, or lighting) yourself

Tips To Cook More Comfort With Kitchen Remodelling

Ways You Can Determine the Right Kitchen Remodel for Your Project

You’ve decided to remodel your kitchen. Now what? Not knowing where to start, many homeowners start by looking at kitchen appliances. Others collect inspiring kitchen photos. Some homeowners decide they need more room. Others simply want to upgrade their current kitchen. Homeowners may find themselves in this exploration stage for a year or longer before they start interviewing kitchen designers or general contractors.

Let’s take a step-by-step look at how to remodel your kitchen.

Think About What You Need in Your Kitchen Remodel
This step is all about figuring out how you use your kitchen, and finding the layout and features that fit your household’s lifestyle.

Think about your priorities and ask yourself some questions. How many people will be cooking and gathering here? How will they need to move around? Do you need an addition, or can you work with your existing kitchen footprint?
If you haven’t done so already, start saving photos of kitchens with features that suit your style. Your collection can be organized and beautiful like a scrapbook might be, or it can be filled with unorganized images. I like to randomly stuff images into my folders and ideabooks and go back to them later for edits.


Planning a Kitchen Layout

More than any room in the house, the kitchen needs to be practical and functional. Think about how you use your current kitchen to identify your priorities for the remodeled space. What works and what doesn’t? Give considerable thought to the layout of the room and assess what will work best for your household.

Whenever possible, make use of the classic work triangle. Arrange the sink, refrigerator, and stove (the three features used the most) in a triangular pattern. This is generally considered to be the most convenient setup because it saves unnecessary steps.

Also, think about how many people usually work in the kitchen at the same time. If it’s more than one, you might want to incorporate more than one workstation. Or, if there’s enough space, consider adding an island or purchase a wheeled cart that can be moved around the room and put away when not in use.


Finishing the Walls

Once a renovation project passes inspection, it is time to finish the walls. Hang, tape, and finish drywall according to your project plan. This includes any drywall necessary for a countertop bar or other section of the kitchen. If you aren’t skilled in this area, consider hiring a contractor to finish up the process.

This is also an optimum step to add a coat of primer to the drywall, even though you won’t add paint for quite some time. Why? The primer seals the facing paper and protects it against scuffs and scrapes when installing other items in the room. Accidents easily happen when you’re moving bulky cabinetry and appliances into the space, and this keeps it in great shape until you’re ready to add a splash of your favorite color later on in the renovation process.

Install Doors and Windows

After drywall, it is time to install any doors or windows. If you’re sticking with the same structure as your old kitchen, you might not have to do anything for this step. Simply take the time to wipe down your old ones with a good cleaner and seal any existing cracks around the windows with caulking to help insulate more effectively.

If you’re adding new doors or windows to the space, make sure to insulate them properly. A vast majority of a home’s energy cost each year comes from lost hot and cold air. Unsealed kitchen windows not only make your space less comfortable, but they could also cost you hundreds of dollars in heating and cooling bills.


Install Cabinetry

Even if you’re handling the renovation yourself, consider hiring a professional to install cabinets for you. The last thing you want is to get your cabinets up and start refilling them only to have them fall down or to realize you didn’t level them properly. A professional will make sure the cabinets are installed properly.

Open Shelving

Floating and open shelving is trending in homes across America. This design concept is loved by many designers as well, because it allows you to use your well-designed kitchenware as décor.


Bring in the Pros

There are two main players when it comes to professional kitchen remodeling help:

  • A kitchen designer
  • A general contractor

A kitchen designer ensures that your kitchen space is functional, efficient and the best value for your budget. They take the time to learn your needs and wants. Then they translate those into a functional, beautiful, and actionable plan.

A general contractor (GC) coordinates the build-out and installation of the kitchen designer’s plans. The GC is in charge of organizing products, materials and people. They schedule work for the trade professionals typically involved in kitchen renovations such as electricians, plumbers, tile professionals, fabricators, and finish carpenters.

Start early and be proactive with bringing in professionals. Their expertise will help you make better remodeling decisions, and making early appointments will ensure that you have a spot on their calendars. The most well-regarded pros have very busy schedules, and it’s common for a contractor to be booked months in advance.

What about interior design or architectural services? If you’re remodeling your entire house, or making major structural changes, you may have an interior designer or architect helping to coordinate the project. But if you’re only remodeling a kitchen, their services are not critical, even though they can add significant costs to the project.

Between you, your kitchen designer and your general contractor, you should able to make sure that your kitchen is decorated, designed and built to your liking.

Happy remodeling!